
We’re continuing our discussion of the new FileMaker 19 add-ons. Claris has released a great video on these add-ons, but, in this series of posts, we’re taking a deep dive into how the add-ons work. In this post we look at the FileMaker Add-ons Filter mechanism.
The Default Behavior
By default, the add-ons work with all the data in the target table. If you select the “Events” table as the data source, you’ll get all the records. The Heatmap and the Calendar actually search for a range of records by default (as we can demonstrate below) but for the most part, add-ons use display all the records in the target table. This happens automatically using the add-ons Find functionality
We can, however, filter the data set to return only some of the records in the table (or in the range of returned records). The Add-on contains a specific piece of functionality to add a filter without revising any scripts. Let’s take a look at this.
FileMaker Add-ons Filtering: Return Some Records
The heatmap add-on returns records within the three month range as shown in the add-on. It returns all the records in this range and plots them on the widget.
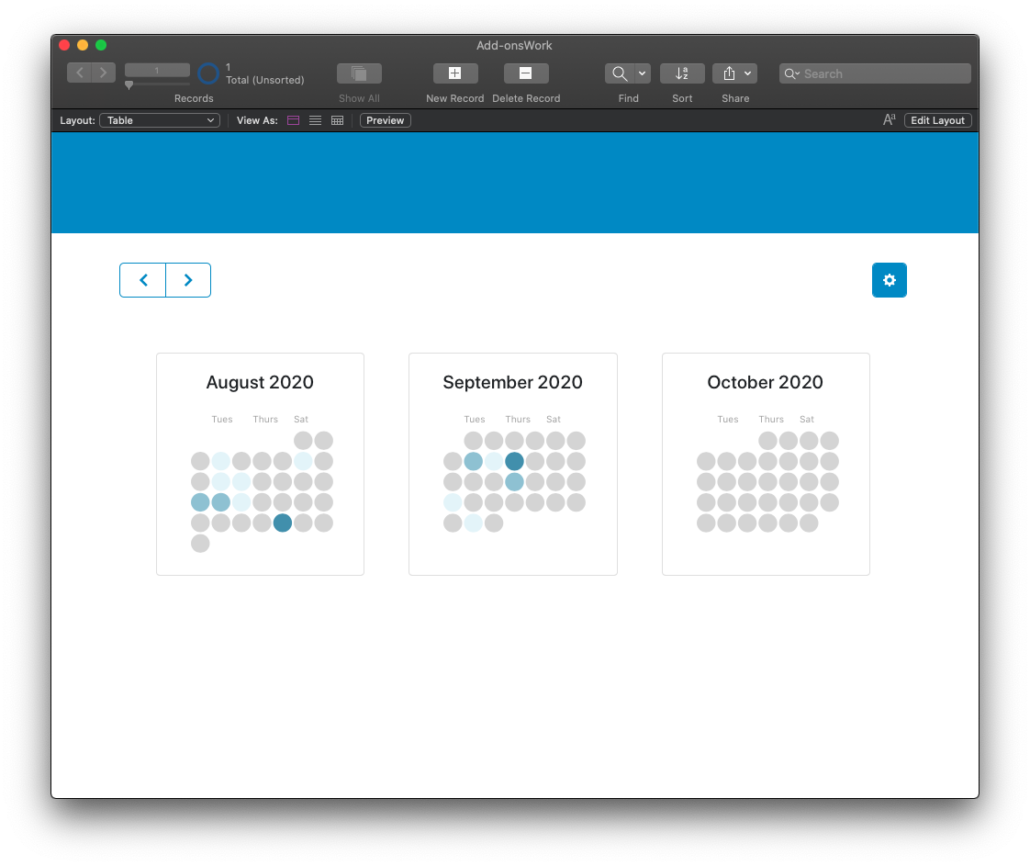
If I click on September 10, 2020, I get three events, one for projects 3, 4, and 5.

Let’s say, however, users would want to only see their projects. When User A logs in, she is assigned only to project 3, so she should only see project 3. Well, with the add-on Configuration, we can apply a filter to a field in the target table so that User A only see’s project 3.
In the configurator there are two settings for the filter: the query field and the filter field.
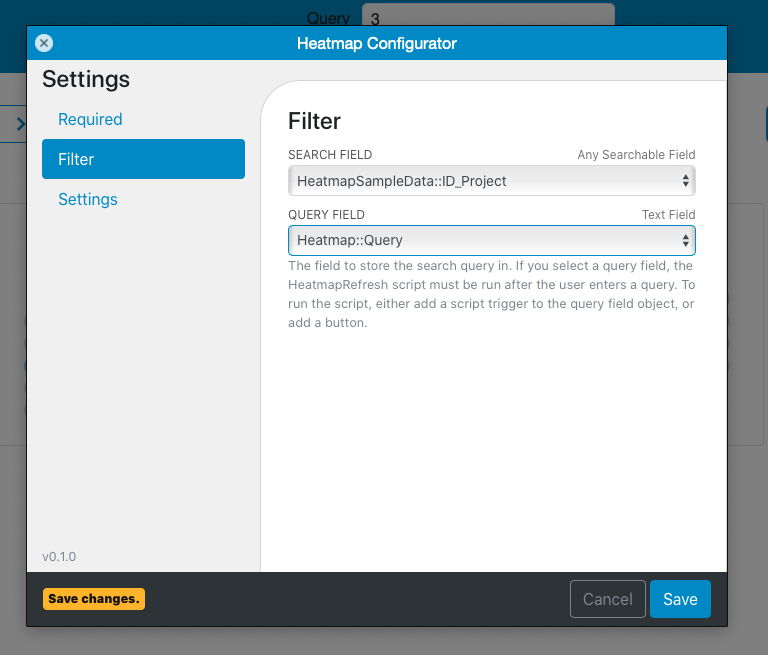
The filter field is the field in which the search criteria will be applied. In the example above I’ve set the filter field to be the HeatmapSampleData::ID_Project. Does that make sense?
On the layout where the Heatmap is located, for the sake of simplicity, I placed the global query field and entered “==3”. In our world, this means “find all records with an exact match of 3 in the field”.

What the add-on will do is, when it does the next refresh of data, it will apply this filter “==3” to the data set in the find mechanism, and return just those records where 3 is in the ID_project field.
After I applied it to my data set, 9/10/2020 shows only 1 event, and that event is for Project 3.
That’s pretty nifty.

Oh, the Possibilities
I can hear your little gray cells activating and thinking of possibilities for this FileMaker add-on filter. Maybe some of what you’re forming in your head is listed below:
- The field doesn’t have to be visible on the layout. It can be offscreen, or it can be removed once the Configuration has been set.
- The field can be set via a script. For example, your onOpen script can set this field to the user’s projects.
- The text inside the Query field can be any string we use to perform FileMaker finds: “<=1/1/2020”, “!”, “==4”, “*” , “=”, etc.
- The field can be displayed as a pop-up control with a value list.
- If you do use a value list, you might have to go further under the hood to add the FileMaker operator symbols via the Find script.
Deeper Under the Hood
I’m giving you the details about how to use the filter mechanism. That’s good. If you want to know how this actually works, read on. Otherwise skip to the next section.
When a Filter Field is designated in the configurator, the filter value is applied to the target field in the AddonFind script. The filter field and value is added to the query that is used in the Execute FileMaker Data API script step. See here:
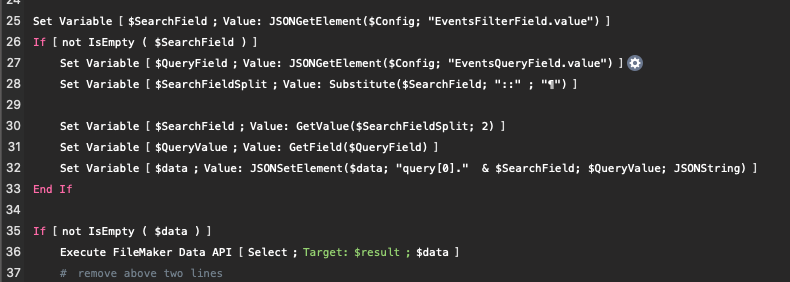
Inside the Config of this add-on, there’s an “EventsFilterField.value” property. This holds the NAME of the field in the target table in which to search. If there is a here, then lines 27-32 run and we grab the name of the filter Field and get its contents and then finally (line 32) add it to the query section of the $data (the request).
Read more about the Find script in that blog post. There we talk about how to adjust the find to fit whatever scenario you’d like.
Actually Applying the FileMaker Add-on Filter
As we will discuss in other posts (they’re coming soon), the add-on periodically does a refetch of the data and refreshes the add-on with any new or changed data. But you can force a refresh of the data, thus applying the FileMaker add-on filter, at any time. In each add-on there’s a script called “Refresh” that does this work. Apply this to a button or to a field as a script trigger and this will cause the data to refresh with the given filter you’ve set up.
Refer to that blog post about Refreshing (coming soon).
Filtering in the Add-on
So there you have it. A complete and hopefully clear guide to how add-ons provide filtering functionality. Play with this and give it a try. Let us know what ways you were able to apply this filter idea to your use of these add-ons.
Trackbacks/Pingbacks