As we have said before (and I’ll probably say one hundred more times), the Claris FileMaker Add-ons just work. In just a few minutes, you can get a fully functional heatmap or activity timeline running with your data (all records or a found set) in your custom apps. In just a few minutes, you can solve a high-value problem for your customer. Add-ons bring more power to the problem solver.
However, there’s a lot of us that want to know how the add-ons work. So let me explain, generally, how they work. We built these add-ons with the following ideas in mind:
- They provide a complete package of scripts, layouts, custom functions, and objects.
- They needed to be self-booting. No special setup is needed.
- They needed to work on all parts of the platform.
- In some cases, they needed to refresh themselves or refresh by an action.
- They need to work with your data and with your choice of settings.
- Many instances of the add-on can be used throughout the file, even multiple instances on the same layout.
Let me explain these ideas. The ones we skip for now will be detailed further in separate posts.
Types of Add-ons
There are two types of add-ons included in the FileMaker 19 update: Dashboard and single record add-ons.
The Dashboard add-ons include Kanban, Activity Timeline, Calendar, Heatmap, and Photo Gallery. I call them “Dashboard” add-ons because of two reasons: They can work with a found set of records from any table in your entire app, and they can be placed anywhere in your file. The context isn’t important; all the scripting and custom functions can gather the data and code necessary for the add-on.
The Single-Record add-ons include Rich Text Editor, Timer, and Barcode Generator. These require the context that provides them the relevant fields. For example, the Timer add-on needs to be on the “Task” layout so that the user can use the add-on to time her work.
Keep these two types in mind as you work through the rest of this.
Complete Package
As we’ll say repeatedly, these add-ons provide a complete package of functionality. That includes all the tables, layouts, scripts, JavaScript code and custom functions. Here’s a breakdown of each of those.
Tables
There are two tables that are part of each of the add-ons: a SampleData table, and an Addon table, a table named after the add-on.
Sample Data
This table holds records that are used when the add-on first is installed. After dragging the add-on to a layout, the widget gets data out of this sample table so you can see immediately what it looks like working. Feel free to delete this table any time during the process.
Addon Table
The Add-on table contains a few important fields, vital to the workings of the add-on. You wouldn’t want to delete this table while the add-on is installed. The fields here are:

HTML: a text field holding the inlined/minified code that runs the add-on. There’s no need to get into this field and examine its contents; the code is practically unreadable.
ConfigStore: This text field holds a JSON object. This Config object contains one object for each unique instance of the add-on you use throughout the file. It determines the layout from which to get the data, the settings, the filter fields, etc. There’s a lot there. When we talk about multiple instances of add-ons, we’ll go more into detail.
Additional Fields: The additional fields that have global storage are there for additional settings. OriginalTable, OriginalLayout, are fields that temporarily store what’s needed for add-on navigation, and the Query field is an example field of how to do a query. Use that field by default for the query. Take a look at that blog post to learn more about how to use this field.
Layouts
Within a Layout Folder with the specific add-on’s name are two layouts. One is the “Configurator” layout, and the other is the Sample Data layout.
The Configurator layout contains only a single web viewer. This layout is opened as a card window. You can rename this since it’s referenced directly in any scripting.
The SampleData layout is used initially as the target layout for gathering data for the add-on. Once you target your own layout, you can delete this layout.
Custom Functions
The two custom functions that come with each add-on are there to build the data URL for the add-on (AddonDataURL) and to collect the configuration of the target widget from the ConfigStore field (AddonConfig). You should not have to do anything with these. Don’t delete them. I would just let them be, but here’s some info about each one:
AddonConfig: This custom function requires the AddonUUID and pulls from the ConfigStore field that config which matches this AddonUUID. As you first install the add-on, the default config (the “Dev_UUID” config) is pulled and used. This config is eventually sent to the add-on code where the individual settings are picked up and used to render the add-on.
AddonDataURL: This custom function builds the add-ons data URL and merging in the initial props of the add-on (found in the web viewer object). This grabs the entire inlined HTML from that field and substitutes in the props.
Again, you probably don’t need to do anything with these. If you want to add props, you can do that in the web viewer object itself.
Scripts
We’ve organized the necessary scripts into “Public” and “Private” folders inside the Add-on named folder. In upcoming posts, we’ll examine many of the scripts. But just know, those in the “Public” folder can be called from buttons or triggers. The scripts in “Private” don’t need to be touched or examined at all. For fun possibly, in a later post I’ll explain the Private folder’s scripts.
Self-Booting
Each of the add-ons was built to be self loading. No action of the user, whether through a button press or moving to a layout, is necessary for the add-on to work. On its own, the web viewer loads the code, grabs the data, and renders it all.
The add-on is loaded through this web-viewer calculation:
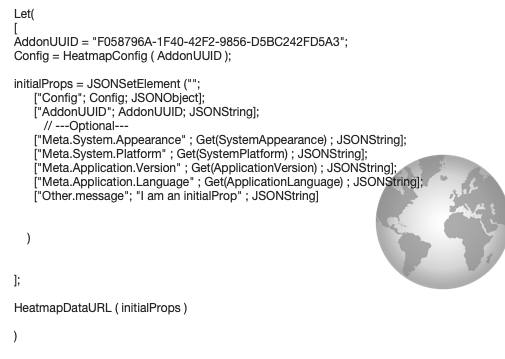
The calculation is fairly straightforward. In the variable declaration of the Let() function, the AddonUUID is generated (see the post about multiple instances) and the config is gathered using a custom function. The InitialProps JSON object is constructed with various values, and then finally the DataURL is loaded into the web viewer with those initial props. From there, the JS takes over and renders the add-on.
Every time a user comes to the layout, this calculation runs and the add-on is loaded with the relevant data.
The Meta properties of the initial props, by the way, a lot of the rendering. For Windows or WebDirect, there’s certain rendering logic the code will execute, and the localization of the add-on is controlled by the Language property.
The Entire Platform
These add-ons are in the FileMaker product, and it was vital to get them working in all parts of the platform. They were tested and we made adjustments based on the needs of, say WebDirect. The new JavaScript functionality allowed us to ensure they work on macOS, Windows, WebDirect, and FileMaker Go.
Refreshing
Add-ons need to be able to refresh so that new data or changed data is visible. So we built mechanisms to do that. We’ll get into the weeds about this in an upcoming post, but here’s the summary. Many of the add-ons will refetch data periodically. They’ll do a complete new find of the data and display the new data in the add-on. Additionally, you can trigger a refresh of the data in the add-on. We’ll get to these in another post.
Work with Your Data
This one is obvious: these add-ons need to work with data in the app (from any table, any set of records (all or a found), and this needs to be set up easily. To accomplish these goals, the add-ons are constructed to use your data through the Configurator.
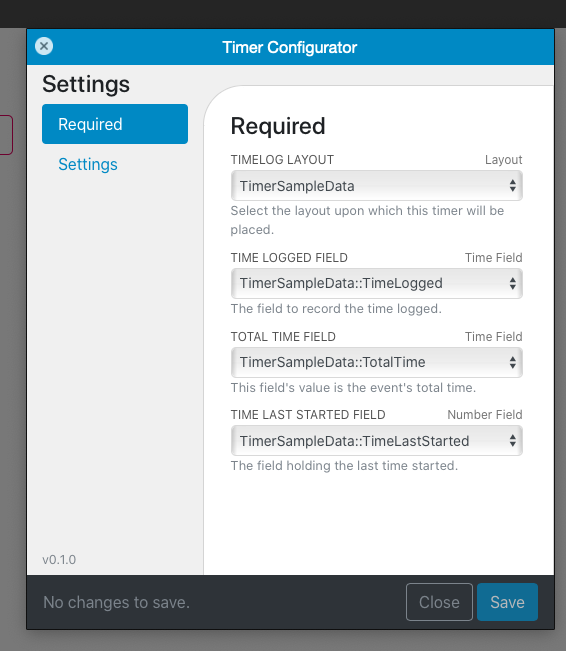
This is the only place you’ll have to do some set up right away after installing. In browse mode, click the gear icon (usually at the top right of the web viewer) and open the configurator. Here you’ll be given various required choices, a choice of filters (if applicable), and some add-on-specific settings.
Each option has some clarifying help text below, but I’ll point out some extra details:
Each add-on requires a layout choice. In most cases, this layout will be the data-source layout–the layout from which the data comes.
The Dashboard add-ons–Kanban, Calendar, photo Gallery, Heatmap, and Activity Timeline–all require a data source layout. The Single-Record addons–Timer, Barcode Generator, and the Rich Text Editor–each require a layout where the add-on is actually placed.
You choose that layout and the rest of the required settings will be fields from that layout. The choices for each field will come from the fields on the layout, and will filter by the type of field required.
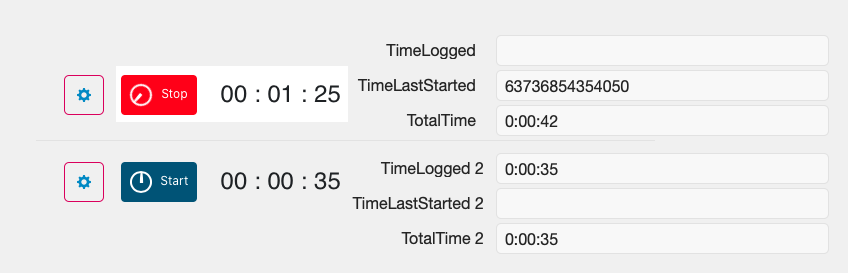
Multiple Instances
You can use multiple instances of an add-on throughout a file or even on a layout. Each add-on can be configured differently in color and in source data fields, and they each run independently. Here’s a silly example, but it does demonstrate the point.
We’ll explore this in greater detail in a future post. There’s a bit to unpack here, so we’ll take a look.
Add-ons Just Work
This Claris FileMaker 19 Add-ons just work. They’re built as a complete package that function as they’re intended. So use them. Explore them and place them in apps for your clients. Use their power to solve complex use cases and move on with other things to solve.
Very very cool stuff. Just started playing around with some of the add ons and these features will definitely add functionality very easily – calendar is a big one. I love it. The eSignature add on from KyoLogic is also another very cool add on for iPad signatures. It’ll be interesting to see what comes out over the next few months.